Well, i'm embarrassed to say it's been five months since I've posted on here. However, I was a little busy with school, and work, and whatnot. I'm saddened to say that the inspiration for me writing this is nothing to be celebrated. Today, as I'm sure we all have seen there was a tragedy in Colorado, a mass shooting. What a scary sentence. When I woke up this morning, the news was on in the background, and I happened to over hear about the theatre shooting. Today, as ABC has had more information, and segments on exactly what happened, I found myself sitting in front of the television with tears rolling down my face, I can't even begin to understand what those families and friends of the victims are going through. The movie theatre is supposed to be a "safe" place for people to go. I know that personally, it's going to take me awhile to step foot back into the cinema. Even if it is about "facing your fears" I don't think I really would even be able to enjoy a movie knowing what happened not even twenty four hours ago. I also got to thinking about how lucky I am to live in a small town in Michigan. But the real truth is that this could have happened anywhere. Whether you are in a big city, or rural town, danger lurks. Its sad that it takes a tragedy like this to put my life back in perspective for me, but I know that I will say I love you more often to the people closest to me, and I will cherish the time with my friends. Because as victim Jessica Redfield wrote in her personal blog: "I was reminded that we don’t know when or where our time on Earth will end. When or where we will breathe our last breath. I say all the time that every moment we have to live our life is a blessing. So often I have found myself taking it for granted. Every hug from a family member. Every laugh we share with friends. Even the times of solitude are all blessings. Every second of every day is a gift. After Saturday evening, I know I truly understand how blessed I am for each second I am given."
Life is a gift. A special, special gift. We never know when it could be taken from us, or from our loved ones. So, as much as I want to sit here and cry for those who have had lives taken by a careless, horrible man. I'm going to pay my respects by doing exactly what Jessica said to do in her last blog post she would ever write. I'm going to approach each day as if it were my last, because who knows if it will be. I'm going to be thankful for those around me, and let them know that they mean so much to me. My heart truly goes out to those affected from last night's horror, may the loved ones they lost rest in peace. And let the victims who are still in the hospital have a successful recovery, physically and emotionally.
Friday, July 20, 2012
Wednesday, February 15, 2012
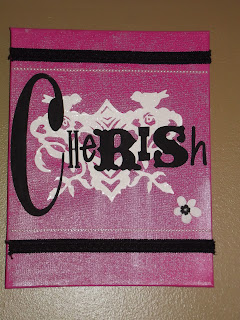
Since I haven't done a post in awhile about crafts, I thought i'd update on the crafts i'm currently working on/ have already completed before I started the blog. The first on is my plaque's. My Aunt Lindsay has the crafter's heaven of a basement. She has a room that is basically a mini Michaels/Joann's/Hobby Lobby, and always encourages us to use whatever, whenever. So one day I while lounging around their house I saw my cousin Hailey creating these cute little plaque's for her apartment. I then decided to do some for myself, and I love them!
How were they made?
We bought the canvas's on sale from hobby lobby for around seven dollars. When we got home, I painted the canvas with their first coat of pink paint, and while that was drying I painted the letter's black. The letters are made out of chip-board, and can be found at any Michael's/Hobby Lobby store. They usually come in a ton of different shapes and sizes (as you can see from the pictures) and some times they are fun to mix and match.
After painting the letters, I applied a few more coats of pink paint to the canvas, and after it dried, I added a layer of pearl effect paint, Which is why in the close up pictures they look so shiny. After that, I used a machine called a cricut to make the white designs in the back of the letters.
(The lovely little cricut machine)
I mod-podged those on to the canvas's, and let dry. Then I used some craft glue to put the letters on the canvas's, and used craft glue to attach all the embellishments too. I think they turned out pretty cute, and They were really easy to put together!
Another little project I completed at my Aunt Lindsay's was this little masterpiece:
These were really easy to do too, and pretty cheap! We went to Michael's and found the letters for my name, and bought some zebra print wrapping paper. (I would definitely suggest getting tissue paper over wrapping paper though, it's a lot easier to wrap around the letters)
I put Mod Podge on the front of the letters, and put it on a little square of wrapping paper, then took more mod podge, and drenched the wrapping paper in it so that it would go around the letters, and let dry.
The only other thing we did was add glitter to some letters, and ribbon with flowers to the others.
-Hillary <3
Random Acts of Kindness.
I haven't been on here in quite awhile, school and classes have been taking up more of my time than crafting/doing fun things lately, unfortunately. However, I do have some good news. 1) I am going to florida soon, which means a huge long blog post about that coming up. And 2) My birthday is coming up! In a month or two..haha. I tend to plan WAY ahead for these things.
While looking for fun things to do on my birthday, I "stumble upon-ed" this site called the birthday project. http://www.thebdayproject.com/ It's basically about doing good deeds towards the community on your birthday. So since I'm turning 20, I'll be doing 20 random acts of kindness towards some lucky strangers I meet during the day :) I've been recruiting friends to tag along with me for the festivities, and it should be lots of fun. I've been brainstorming what good deed's i'll accomplish and here are some of them:
1) Buy some flowers, pass them out to people who look like they could use a brighten to their day.
2) Pay for someone's meal.
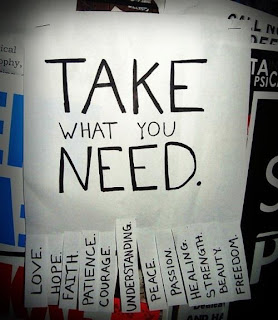
3) Make those cool little flyers telling people to "take what you need"
4) Write letters to everyone in my life that has made a difference.
5) Donate a few bags of clothes to Salvation Army
6) Buy toys to donate at the childrens floor of the local hospital
7) Make someone laugh
8) Call up a old friend, and catch up
And that's all I have so far! I'm open to suggestions if anyone can think of anything
On another note, Spring break is rapidly approaching, and that means this girl is heading to Ft. Myers, and Orlando Florida! Horray! That will be one exciting blog post, so everyone.....prepare for that one. :)
Valentines Day, Shmalentines Day
This year the thought of Valentines day made me want to jump in a hole and hide. But instead of that, I spent the day with two of my best friends, and it turned out pretty good! I started out the day by going to class with my friend Breanna, and then coming home and cleaning. Then amanda came over, and we went to Panera, where I tried a really good salad, and we came home and just hung out around my house. All together, a pretty fun day. Not much more to say about it, but here's some pictures :)
Tuesday, January 17, 2012
Random post about random things.
Lately, I have had a little problem with my hair. After WAY TOO MANY box dye jobs, and a split-second decision a few summer's ago to get a perm with my best friend, when I already had severely damaged hair. My strand's are a bit on the fried side lately. My cousin, who cuts my hair almost killed me the last time she saw it. So, I have been trying to get it back to it's healthy look again, which has been quite the struggle. I started using Organix shampoo and conditioner, because it is sulfate and paraben free, and because it just smells really good. I use the Cherry Blossom and Ginseng.
I also got Nexus Split End Repair, which works amazing. I put it in my hair after I get in the shower, and it dries like normal healthy hair would. Which is quite a change, because before I used this if I let my hair dry naturally it would poof together, and just be a big tangled mess because it was so dead. So, if you are having problems like this, I would definitely recommend you try this stuff!
And now that my hair is actually starting to get healthier (and even grow a little too) I've started styling it again. While I was looking for different ways to do it, I came across a blog that said to put bobby pins in with the wavy part down. I have never done it like this, so I tried it, and it turns out that they really do stay in better that way.
I also tried a waterfall braid in my hair, which turned out okay, but I think it still needs a little more practice. But, here's some hairstyles I've been trying recently:
The waterfall braid, which is basically a french braid but you leave the bottom pieces out.
Half-up half-down. (I wore my hair like this for a long time because the front was so dead, and this hid it a little)
And just a french braid with my bangs. (This is a really old picture but it's the only one that I had of the braid)
So, Hopefully with more trial and error, I will be able to post more hairstyles, and tricks on keeping it healthy! Thanks for reading!
Tuesday, January 10, 2012
Nonsense and Neighbors
A couple years ago, I got a Brighton bracelet as a gift. At one point I had a lot of different charms on it and almost had the whole thing covered. But then I decided to switch the charms up and start over with them. So lately, I have gotten a lot of new ones and I thought I'd post about them on here :)
Hopefully i'll be able to add more soon.
On another note, I started my math class today with my friend/neighbor Bre, and afterwards we went to her house when she told me she wouldn't talk to me until I featured her on my blog. Her brother Matthew said the same thing. So here is my tribute to them:
Hope you all have a good day :)
Monday, January 9, 2012
The project that lasted a lifetime.
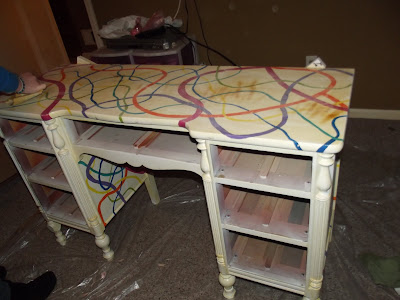
About a week ago, I was sitting in my room with my good friend Renee when I came up with the brilliant idea of re-painting a old make-up counter my mom gave to me years ago. We decided to do this at around 8:15, and realized at around 8:30 that we would need a stencil from Michael's to finish the project. We called up to the store, found out they close at nine, and pulled into the parking lot at 8:57 to get this beloved zebra-print stencil. I had on all my paint gear, and needless to say was not looking my finest. I would post the picture I have, but i'm afraid it would scare all of you away. :)
This project took A LOT longer than I intended for it to, and actually as i'm writing this post, about a week later, it's still not all put together. It took a lot of patience, and trial & error to finish. But i'm pretty proud of the results. This is the most recent picture of the make-up counter I have, but will update once I have it all put together. (The only thing I have left to do is to put the knobs on the drawers)
The supplies I needed for this project were:
1) Different colors of paint. (I used some paint that we already had left over from painting my room, and the doors in our house)
2) Stencil from Michaels ($10)
3) Different sized brushes
4) Sandpaper
5) Plastic (to lay on the floor)
6) Spray Adhesive ($5)
7) Mod Podge
8) Screwdriver
9) Spray Paint(black)
10) Painter's Tape
We started out with the drawers, we sanded them down, and painted several layers of the pink paint over it to get the end results, and then let dry over-night.
Then we moved to the actual make-up counter, We started out by laying a huge piece of plastic on the ground because I am really messy at painting, and then sanded the whole thing down.
After we sanded we started with the first layer of white, and because of the previous painting and the random stripes it had, this thing took a ton of paint to cover all of it up. So, fast forward a couple hours, and you get this:
After letting that dry, we started with the pink accent's. I decided I wanted to do the outer decorations, and the inside of the desk itself. It ended up being a lot harder than I anticipated it being, especially using a big brush, so we ended up using a old nail polish brush, which actually got the job done.
The next morning, I started with the stencil, which I decided only to put on top of the counter. I used a spray adhesive to one side of the stencil to make it easier to use.
It took awhile to get all of the stencil-ing done, because I had to wait for it to dry before moving the stencil, otherwise the black paint would get everywhere. But, eventually it turned out really good!
Once that was dry I started on the mirror. I used painter's tape to protect the mirror, sanded down the old paint, and then painted it all pink.
Then I took mod podge (found at any craft store) and covered the entire thing with it, that way it seals in the paint and prevents it from flaking off.
The last part of the project was spray painting the old knobs we had on the drawers black to match. They are currently in my basement drying, and will post a final picture once they are back on the drawers, and the whole thing is put back together.
All together this took probably ten hours. A long time. But, I think it was worth it. And thank's to my mom and her handy mini craft store in our basement, this project only cost me ten dollars total to complete. Now that school it back in session, I don't know how many project's like this i'll be able to do, but I do have a desk in my room that's calling my name :)
Thank's for reading!
This project took A LOT longer than I intended for it to, and actually as i'm writing this post, about a week later, it's still not all put together. It took a lot of patience, and trial & error to finish. But i'm pretty proud of the results. This is the most recent picture of the make-up counter I have, but will update once I have it all put together. (The only thing I have left to do is to put the knobs on the drawers)
The supplies I needed for this project were:
1) Different colors of paint. (I used some paint that we already had left over from painting my room, and the doors in our house)
2) Stencil from Michaels ($10)
3) Different sized brushes
4) Sandpaper
5) Plastic (to lay on the floor)
6) Spray Adhesive ($5)
7) Mod Podge
8) Screwdriver
9) Spray Paint(black)
10) Painter's Tape
We started out with the drawers, we sanded them down, and painted several layers of the pink paint over it to get the end results, and then let dry over-night.
All together this took probably ten hours. A long time. But, I think it was worth it. And thank's to my mom and her handy mini craft store in our basement, this project only cost me ten dollars total to complete. Now that school it back in session, I don't know how many project's like this i'll be able to do, but I do have a desk in my room that's calling my name :)
Thank's for reading!
Subscribe to:
Comments (Atom)


